Supplies:
- Modge Podge (or similar product like liquid starch)
- glitter (any color)
- white yarn
- glue
- small balloon (water balloon size works well)
- 1-inch styrofoam ball
- 1 black pipe cleaner
- black paint
- paint brush
- tissue paper (to match glitter)
- newspaper
- optional: cloth to wipe yor hands
Instructions:
Step 1: Cover your surface with newspaper or a centuries-old cape you don’t want anymore—this Halloween craft can get messy!
Step 2: Blow up a balloon.
Step 3: Pour a good dollop of Modge Podge on a throwaway plastic lid or into paint dish.
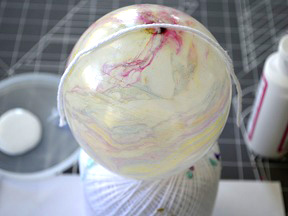
Step 4: Cut a piece of white yarn long enough to wrap partway around the balloon vertically (like longitude lines on a globe). Each piece of yarn should go about 3/4 down each side of the balloon; cut 6 – 8 strands of yarn to this length. These are your longitude pieces.

Step 5: Cut 2 – 3 pieces of white yarn long enough to wrap all the way around the middle of your balloon (like an equator). Next, cut one smaller piece of white yarn to wrap around the balloon neat the top (like a latitude line that stretches all the way around the northern section of a globe). These are your latitude pieces.
Stand 6: Position your balloon on a stand; a cup, goblet, or anything with a round opening large enough works great for a base to hold your balloon—like a small jack-o-lantern without its lid.
Step 7: Run each piece of string through the Modge Podge, and starting with the longitude pieces of yarn, stick the strips in a vertical pattern around the balloon like longitude lines on a globe. Remember that the pieces of string should only go about 3/4ths the way down the balloon on either side. After you run each piece of yarn through the Modge Podge, run your fingers down the string to squeeze off any excess Modge Podge and even it out. This is where this craft can get messy! You may want to keep a cloth handy to wipe your claws when they get drippy.
Step 8: Once the longitude lines are done, start with the latitude lines. Add the horizontal strings starting with the smallest string, dip it in the Modge Podge, then add it to the web toward where the vertical strings cross at what is the top now (but will eventually be the base of your treat cup). Dip the other 2–3 longer latitude strings in the Modge Podge then add them about an inch apart horizontally around the middle of the balloon.
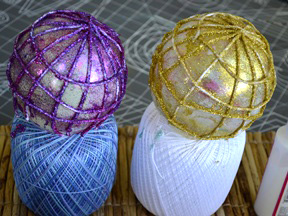
Step 9: Shake glitter over the top of the finished web. You can use one color of glitter or a mixture of 2 or more colors. The glitter will stick to the Modge Podge. This can get a little messy! Set the balloon aside to dry overnight.

Step 10: Paint the 1-inch Styrofoam ball black as night, and set it aside to dry.
Step 11: Once the Styrofoam ball is dry, cut 8 pieces of black pipe cleaner to make the spider’s legs. Each pipe cleaner spider leg should measure about a 1/2-inch of creepy-crawliness.
Step 12: When the Styrofoam ball is dry insert the pipe cleaner legs into the sides of the ball. To make your arachnid come alive!

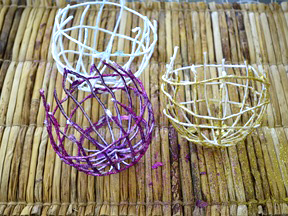
Step 13: Once the sparkly glitter web is dry, pop the balloon and throw it away. Turn the sparkly spider web over and it should be able to stand up on its own, ready for a fuzzy little friend to climb onto it. You may need to flatten the base a little with your hands.

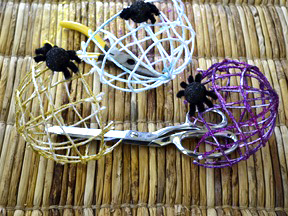
Step 14: Glue the spider to the side of the web, and set it aside to dry.

Step 15: Add some tissue paper to the inside of the web and fill with Halloween treats! Whether you have little monsters, humans, or a Dennis of your own at home, this craft is sure to be a crowd-pleaser once you display your handmade glitter spider webs for Halloween.
*This post is sponsored by Sony Entertainment.
More Halloween DIY Crafts:


