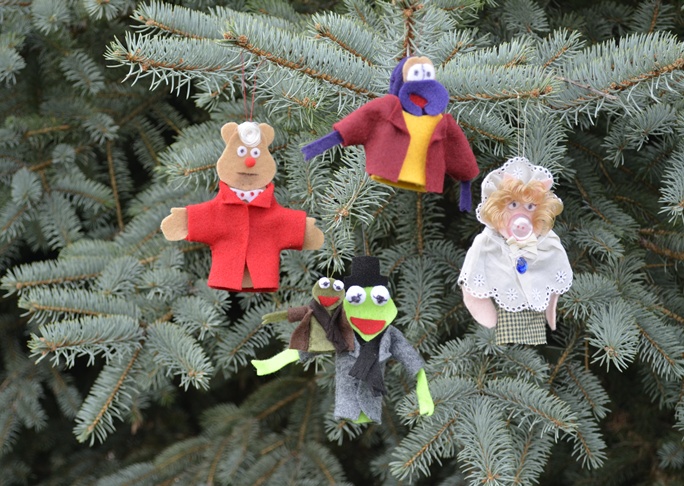
Materials:
For all the Finger Puppets:
- scissors
- needle
- straight pins
- glue
- black fine point permanent marker
For Mrs. Cratchit/Miss Piggy:
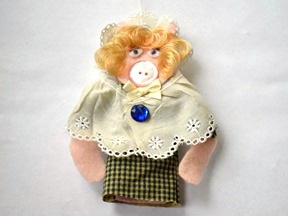
- Mrs Cratchit pattern
- pink felt
- pink embroidery thread
- pink button
- a small piece of off white lace (1/4 yard max)
- a small piece of off white thin ribbon 4 to 5 inches of 1/4 inch
- small stick on or sew blue gemstone
- small scrap of a small calico print fabric
- embroidery thread to match print fabric
- blonde doll curly hair
For Mr. Cratchit and Tiny Tim/Kermit and Robin the Frog:
- Mr. Cratchit and Tiny Tim patterns
- bright green felt
- darker green felt
- brown felt
- dark brown felt
- gray felt
- black felt
- red felt
- 2 white pom poms, 1/4 inch
- 2 white pom poms, 1/2-inch
- green embroidery thread
- brown embroidery thread
- black embroidery thread
For Fozziwig/Fozzie Bear:
- Fozziwig pattern
- light brown felt
- light brown embroidery thread
- red felt
- red embroidery thread
- white felt
- 1- 1/4 inch red pom pom
- red permanent marker
- small piece of white doll hair
For Charles Dickens/Gonzo:
- Gonzo pattern
- dark blue-purple felt
- purple felt
- tan or light brown
- white felt
- navy blue embroidery thread
- red felt
- dark red felt
- dark red embroidery thread
- gold yellow felt
- yellow embroidery thread
Instructions:
Step 1: Print out and cut out the pattern pieces for each of the finger puppets.
Step 2: Lay out the body pattern pieces for each finger puppet on the corresponding color of felt (the correct colors are written on the pattern pieces). Trace the body pieces onto the fult and cut out the felt along your traced lines.
- For Mr. Cratchit/Kermit: Cut 1 face, 2 arms, 2 body from the bright green felt. Cut 1 mouth from the red felt.
- For Tiny Tim/Robin the Frog: Cut 1 face, 2 arms, 2 body pieces from the dark green felt. Cut 1 mouth from the red felt.
- For Fozziwig/Fozzie Bear: Cut 1 face, 2 arms, 2 body, 2 ears from the light brown felt. Cut 2 eyes from the white felt
- For Charles Dickens/Gonzo: Cut 2 body pieces and 2 arms from the dark purple or dark blue felt. Cut 1 nose and mouth from the purple felt. Cut 1 pair of eyebrows from the tan felt. Cut 1 pair of eyes from the white felt.
- For Mrs. Cratchit/Miss Piggy: Cut 2 body, 2 arms, and 2 ears from the pink felt. Cut 2 eyes from the white felt.
Step 3: Assemble the Muppet’s faces.
- For Mr. Cratchit/Kermit: Use a black fine tip permanent marker to make the center of the eyes on 2 of the white 1/2 inch pom poms. Glue the poms poms to the top of his face, as shown in the diagram on the Mr. Cratchit pattern. Glue the red mouth to the bottom part of his face.
- For Tiny Tim/Robin the Frog: Use a black fine tip permanent marker to make the center of the eyes on a pair of 1/4 inch white pom poms. Glue the pom poms to the top of his face, as shown in the diagram on the Tiny Tim pattern. Glue the red mouth to the bottom part of his face.
- For Fozziwig/Fozzie Bear: Glue the ears to the top of his head from behind, as shown in the diagram on the Fozziwig pattern. Use black permanent marker to make the centers of his eyes. Glue his eyes to his face toward the center, and glue 1 red 1/4 inch pom pom to the center of his face as his nose. Use the permanent black marker to draw Fozzie’s mouth below his nose. Glue a small amount of white doll hair between his ears for his wig.
- For Charles Dickens/Gonzo: Gonzo doesn’t have a separate face, so you’ll need to sew up his body before you can assemble his face (see Step 4). Once his body is sewn together, turn him right side out and glue on his nose and mouth with his eyebrows right above, and his eyes over the top of his eyebrows in a second layer as shown in the diagram on the Gonzo pattern. Add a small piece of red felt behind his nose for his mouth. Use a black fine point permanent marker to draw in the center of his eyes.
- For Mrs. Cratchit/Miss Piggy: Glue her ears to the top of her head. Glue on her eyes, and glue a button nose to her face as shown in the diagram on the Miss Piggy pattern. Use a black, permanent fine-tip marker to draw the center of her eyes and to add her trademark eyebrows. Add blond curls by gluing curly blond doll hair around her ears, the top of her head and down the outside of her face.
Step 4: While the puppet’s faces are drying, sew the puppet’s bodies together. For each puppet, pin the arms where it’s marked on the pattern. Pin the arms so they’re sandwiched between the pattern pieces, and so you’ll catch the tops when you stitch around the body. Then, pin the bottom part of the arm so it won’t get caught and sewn into the body by accident. Sew around the outside edge of all the puppet bodies with corresponding embroidery thread, and tie the thread off in a knot by looping the needle back through at the end.
Step 5: Turn the puppet’s bodies right side out. If you have a difficult time turning the puppets with your fingers, you can use a pencil or a crochet hook to help.
Step 6: Attach the puppet’s faces to their bodies with a little bit of glue, and a tiny stitch or two of embroidery thread to hold them in place.
Step 7: Cut out and stitch up the puppet’s shirts, dresses and jackets. When you stitch them up make sure you only stitch the side seams, and the shoulders. Don’t stitch the neck, bottom, or arm holes of the garments.
- For Mr. Cratchit/Kermit: Cut out and stitch up his jacket from gray felt. Turn the jacket right side out. Cut the jacket front down the center, then put one stitch in each side at the top to hold the collar back.
- For Tiny Tim/Robin the Frog: Cut out and stitch up his jacket from brown felt. Turn the jacket right side out. Cut the jacket front down the center.
- For Fozziwig/Fozzie Bear: Cut out and stitch up his jacket from red felt.Turn the jacket right side out. Cut the jacket front down the center, then put one stitch in each side at the top to hold the collar back.
. - For Charles Dickens/Gonzo: Cut out and stitch up his shirt from yellow felt and his jacket from dark red felt. Turn both the shirt and the jacket right side out. Cut a small slit at the top of his shirt in the back so you can pull it on over his body. Cut the jacket down the center of the front, then put a small stitch in each side at the top to hold the collar back.
- For Mrs. Cratchit/MissPiggy: Cut out and stitch up her dress from a small calico print fabric, then cut a small slit (about 1 inch long) in the top back to fit it up over her body and arms.
Step 8: Dress the puppets in their clothes.
Step 9: Add the final details to each puppet.
- For Mr. Cratchit/Kermit: Using the pattern pieces, cut out a top hat and scarf from black felt. Add the top hat to the top of his head with a little glue, and wrap the scarf around at his neck. Cut small slits in the ends of the scarf with scissors for fringe.
- For Tiny Tim/Robin the Frog: Cut out a dark brown scarf with the pattern, and cut small slits in the ends for the scarf’s fringe. Wrap the scarf at his neck.
- For Fozziwig/FozzieBear: Cut out a bow tie from white felt with the pattern. Use a red permanent marker to make the polka dots on the tie, then glue it in place below Fozzie’s chin.
- For Mrs. Cratchit/MissPiggy: Cut a piece of 1/4 inch off white ribbon 4-5 inches long and make a tiny bow. Cut off the excess and glue the bow below Mrs. Cratchit’s chin. Cut a piece of off white lace about 4-5 inches for Mrs. Cratchit’s shawl and wrap it around her. Fasten it in place with a couple stitches of off white thread and a blue gemstone for her broach. Mrs. Cratchit also gets a bonnet. Make the bonnet by twisting a 3 to 4 inch piece of the off white lace into a circle and fastening it behind her head.
.
Step 10: Attach a piece of thread by stitching it into the back of each puppets head. Tie the string into a loop at the top to hang the puppets on the Christmas tree if you want to use them for ornaments, or simply use them as finger puppets.
Want more Christmas Crafts?