alt

DIY Tinted Mason Jars in Rainbow

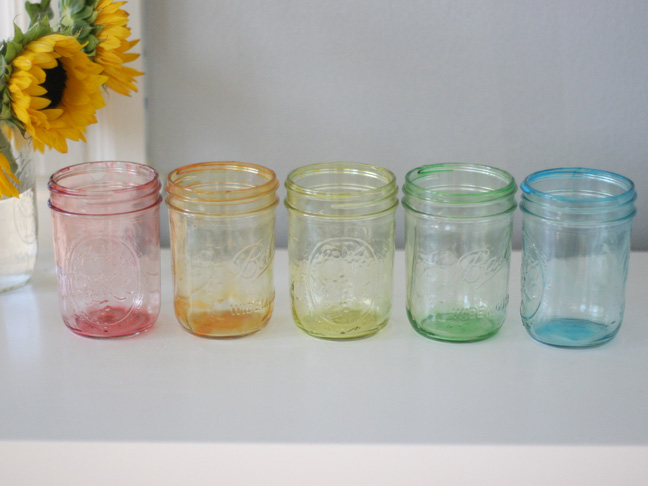
I love using mason jars for decorating and a seemingly endless supply of craft projects. The clear jars are so cheap, but have you tried to buy those vintage blue Ball jars? They’re laughably expensive. I like to make my own instead, and even better, making them at home means I can make them any color I want.

This DIY tinted mason jars tutorial is beyond easy, and the results are gorgeous. I have a couple of these colored mason jars in almost every room in the house.

Check out the video above, and get the step-by-step instructions below:

RELATED: 101 Things to Do with a Mason Jar

a bottle of mod podge shown with assorted food coloring tubes and empty ramekins in the background

Supplies:

4 ramekins each being whisked with yellow, green, red and blue food coloring

Instructions:

Step 1: Mix food coloring with a tablespoon or so of water into individual ramekins. You can create any color combination you like.

mod podge being poured in to empty mason jars

Step 2: Add a couple tablespoons of Mod Podge into your mason jar.

red food coloring being poured in to a mason jar with white mod podge on the bottom

Step 3: Add one ramekin of color into the jar and stir it to incorporate it all together

a empty mason jar with pink gooey material being moved around inside

Step 4: With a bowl underneath, carefully twist the jar around, coating the whole inside with the Mod Podge/food coloring mixture. Pour the excess out into a bowl.

a upside down mason jar coated with a semi-opaque milky pink material coating the inside

Step 5: Let your jar dry upside down on the paper for about 30 minutes.

mason jars coated with a opaque mint green, orange and yellow substance on the inside

Do the same with the other colors and be sure to let them dry for 30 minutes upside-down.

colored mason jars upside down drying on a cookie sheet in the oven

Step 6: Set your oven to “warm.” Place the jars face-down on top of wax paper and a cookie sheet into the warm oven for 10 minutes. Then, flip them over and let them dry another 20-30 minutes.

holding a pink tinged mason jar

Step 8: When they’re ready, they’ll look clear and the mixture should lose most of its streaks. If there are streaks left, continue to let the jars dry out in the oven. The streaky pink jar (above) took a little bit longer in the oven than the rest of the jars, but with a bit of patience and drying, the streaks disappeared.

a rainbow of tinted mason jars on a white background

That’s it! You’ve got a gorgeous set of decorative mason jars for flowers or plants or illuminated with battery operated tea lights for an outdoor party.

NOTE: These are NOT safe to drink or eat out of.


More Mason Jar DIY projects:

DIY Mason Jar Sewing Kit

mason-jar-sewing-kit-tutorial

DIY Mod Podge Mason Jar Vase for Fall

fall-leaf-mason-jars

DIY Jack O’ Lantern Mason Jar Kids’ Cups

halloween-mason-jar-jack-o-lantern

DIY Halloween Pumpkin Mason Jars

halloween-mason-jar-project

DIY Chore and Reward System Mason Jars

mason-jar-chores-and-rewards

DIY Mason Jar Snow Globe mason-jar-snow-globe-tutorial
How To Decoupage Mason Jars

decoupage-mason-jar-tutorial

Chalkboard Mason Jar Lids

mason-jar-storage-lids


TRENDING
No content yet. Check back later!
X
monitoring_string = "b24acb040fb2d2813c89008839b3fd6a" monitoring_string = "886fac40cab09d6eb355eb6d60349d3c"