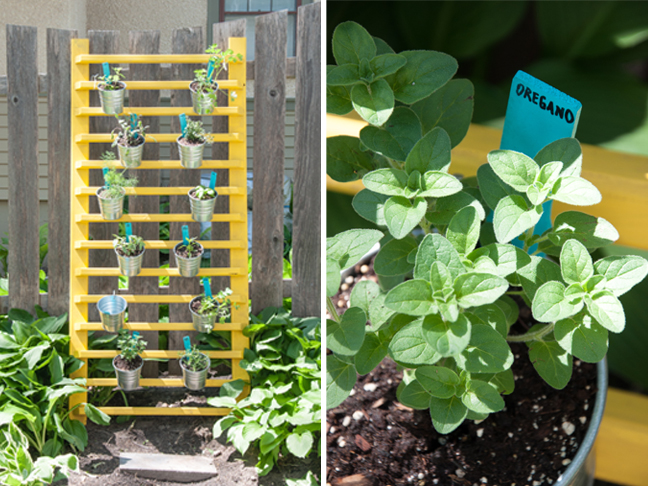
How to DIY a Vertical Herb Garden for Under $100

Our yard is, quite literally, that scene in Snow White when she sings A Smile and a Song. Squirrels, chipmunks, bunnies, birds…we’ve got ’em all. It’s an adorable change from our past life in a more urban part of town where the only animals that would visit us were raccoons pawing through the trash cans.

The big downside of this all is that the fruit and vegetable garden I’d always envisioned is impossible to maintain out here without a series of raised garden beds, wire fencing, and tree guards. Being new to the gardening scene, I’ve been clued in to the wonders of coyote urine as a natural critter repellent (WHO harvests this stuff?), and other weird tricks of the trade to keep the critters out. I wanted herbs ASAP, and planting them out of the reach of rabbits was a one concern of mine; lack of space, the other.

A vertical herb garden was definitely the answer! We wanted it relatively cheap, and to match our house, so we went the DIY route. The best part is that there isn’t a ton of assembly required. The frame is made from a pre-assembled deck handrail ($36) that they have in stock at Home Depot.

My husband did most of the handiwork after I cut myself early on in the process, table-flipped, and decided to shift my role more toward art direction instead.

This is a nice solution if you have limited space (and/or rabbits) in your yard. Here’s how to make a DIY vertical herb garden of your own:

Supplies:

  • Pre-built wood handrail: the one we used is from Home Depot ($36.97)
  • 15 pack of #6 zinc plated hooks – ($5.21)
  • 12 small, lightweight pots that you can drill into (either plastic or aluminum): we used SOCKER pots from IKEA – ($1.99 each)
  • 29 oz can of paint in the color of your choice (we used yellow)
  • spray paint in the color of your choice (for the herb markers)
  • 6 paint stir sticks (hardware stores typically give these away for free)
  • potting soil
  • herbs of your choice
  • drill with a large drill bit (should drill a hole twice as large as the zinc plated hooks)
  • small hand saw
  • plastic cable zip ties to secure the vertical planter to a fence or wall
  • Sharpie or permanent marker

Instructions:

Step 1: Paint the deck rail any color you want (or even leave it natural, if you’d like). We did a pretty sloppy, thin paint job because we want the paint to wear and weather quickly.

Step 2: While the paint is drying, drill a large hole 1/2 inch from the tops of each herb pot. Make sure the hole is large enough to accommodate the hooks you’re using.

Step 3: If your pots don’t already have drainage holes at the bottom, add some.

Step 4: Saw the paint stir sticks in half.

Step 5: Spray paint the stir sticks and let dry.

Step 6: Once the deck rail is dry, secure it to the vertical surface that you’ll lean it against. We used plastic zip ties but any wire or even rope will work.

Step 7: Decide where you want your pots to go on the railing system, and insert the zinc plated hooks. Hang the pots from the hooks.

Step 8: Add your herbs’ names to the tops of the spray panted stir-stick halves.

Step 9: Plant your herbs and add the markers to the soil.

Bask in the deliciousness of fresh herbs until winter comes and kills them all.

TRENDING
No content yet. Check back later!
X
Exit mobile version