Ingredients:
- 6 unfrosted cupcakes in red wrappers
- 6 unfrosted cupcakes in pink wrappers
- 6 red cupcake wraps
- 6 pink cupcake wraps
- 6 inch flower pot
- 6 inch foam ball
- marbles for weight (these are sold for aquariums or floral arranging)
- 12 small dowel rods, each 7 – 8 inches long (sticks for caramel apples work well)
- 4 kabob sticks
- wire cutters
- pink food coloring
- red food coloring
- 4 cups white decorator icing
- Wilton #2D decorating tip or similar large star tip
- 2 pastry bags
- green tissue paper
- glue
- handful red or pink paper shreds
Preparation:
Step 1: Add a second cupcake wrap to each cupcake, so all 12 cupcakes are double wrapped. Keep the colors uniform so that the cupcakes in original red wrappers have a second red wrapper, and the cupcakes in pink wrappers have a second pink cupcake wrapper.
Step 2: Color half the decorator icing pink using pink food coloring, and color the other half of the icing red with the red food coloring.
Step 3: Pour the marbles, or stones into the bottom of the flower pot to add weight and create a stable base for the cupcake bouquet.
Step 4: Cut the bottom off of the foam ball, so you have half a sphere and insert the half sphere into the flower pot, round side up. The ball should fit tightly; if it doesn’t, you may want to tape it down with some floral tape or masking tape around the edges to keep it stable when you add the cupcake roses. It’s very important that the foam ball be stable before you add the cupcake roses, or they may tip out and get smashed.
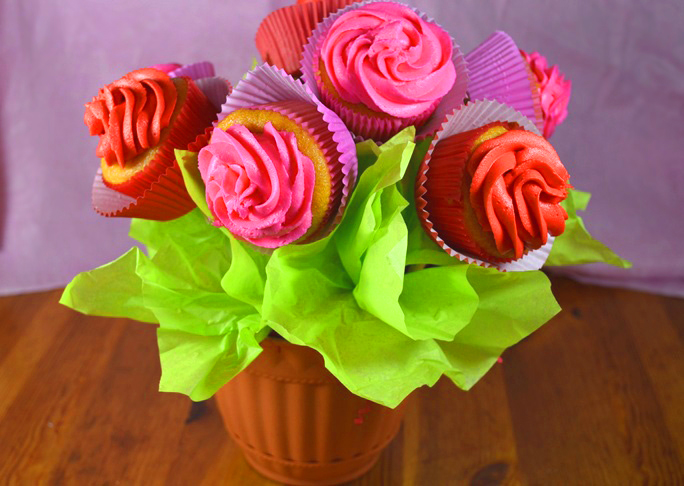
Step 5: Fill a pastry bag with pick icing and attach the Wilton #2D (or similar) decorating tip, and ice the 6 cupcakes in the pink wrappers. To make the cupcakes look like flowers, squeeze the icing in a circular motion starting from the utside working in. Repeat the process with the red icing to frost the remaining cupcake roses.
Step 6: Once they are all frosted, set the cupcakes aside to let the icing dry for a bit before you add them to the bouquet. This is a very important step because if the icing is too wet, it will come off of the top of the cupcakes when you tilt them to add them to the bouquet.
Step 7: Use the wire cutters to cut the kabob sticks into 3 inch pieces. You’ll need 12 pieces.
Step 8: Cut the green tissue paper into 6 inch squares. You’ll need 12 squares.
Step 9: Place your finger in the middle of the green tissue paper square and fold it up around your finger.
Step 10: Put a dot of glue on the point you made in the center of the square, then glue it to a kabob stick piece. Repeat the process until you have 12. These are the leaves for your cupcake bouquet.
Step 11: While the glue is drying, arrange the red paper shreds on top of the foam ball so they hides the ball completely.
Step 12: Once the glue is completely dry, insert the end of the kabob sticks into the foam ball allowing only the green tissue paper to show. Alternate inserting your leaves and the small dowel rods (which will be the “stems” of the roses”) into the foam ball, making sure to leave about three inches of space around the dowel rods so there is ample space when you later add the cupcakes. Make sure the leaves and the dowel rods are stable.
Step 13: Continue adding the leaves and the small dowel until you’ve filled in the vase evenly. Again, be sure the kabob sticks and the dowel rods are well inserted into the foam ball and are stable.
Step 14: Poke a small hole in the center of the wrap on the bottom of each cupcake to make it easier to slide them onto the sticks.
Step 15: Carefully slide a cupcake onto each stick, alternating pink and red as much as possible. If you’re transporting your cupcake bouquet you may wait to do the final assembly until you’re at your destination since the finished bouquet can be a little fragile once the cupcakes are added.
Step 16: Give your Valentine’s Day Cupcake Bouquet to a loved one as a special treat!
Find more from Linette Gerlach at The Kid’s Fun Review.
